Memory Jar

Something Splendid is now over at http://somethingsplendidblog.com. Come check us out over there for even more great ideas.

2014 is here and it is the perfect time to start making new memories. There are many people who do great with journal writing, but if you are like me, sometimes writing in my journal is the last thing I want to do. I do however want to remember the fun times I am having throughout the year. Alas, the memory jar is born. It is a great way to quickly write down a fun thing that happened that day, or an adventure that you went on. At the end of the year, you can go back through and read them all and reminisce on the fun times that 2014 brought.

All I did to make this was take a Mason Jar and wrap a circular piece of chalkboard paper around it. It took all of 5 minutes and I had all the supplies on hand. I have seen this made with a much bigger canister and that was a great option as well. memory jar

EMILYsig

DIY Ugly Sweater Ideas

Something Splendid is now over at http://somethingsplendidblog.com. Come check us out over there for even more great ideas.

There is something about dressing up that makes going to parties even more fun! Ugly sweater parties are a must go-to during the holiday season.  This year I wanted to make an ugly sweater.  I had seen this idea around pinterest and thought I would give it a try.  Trust me when I say it was super easy and cheap.

I bought two 12 pack ornaments from the dollar store along with a tree topper.  I also found some leftover tinsel from decorating our house that I was able to use.  I bought the green sweater from Savers for $3!

photo-2

I then wrapped the tinsel around the sweater until it was covering the whole sweater.  I tied the ornaments onto the front of the sweater where I wanted them and then pinned the tinsel onto the sweater and next thing you know I have an ugly sweater! It took me about thirty minutes, cost me $6, and was a huge success!

photo-22

photo 3

Onto another ugly sweater idea. Emily made hers from a sweatshirt she got at target for $5. She used green felt she had left over from the Felt Christmas Tree. The tree was decorated with pom poms, bells, bows and felt presents all found at Michael’s for 70% off totaling $3.00. It is hard to tell but there are actual lights strung on the tree. Those were leftover from some signs we made this year, but they are battery operated poster lights that can also be found at Michael’s. This sweater cost $8.00 and was totally worth every penny. The tree was safety pinned onto the shirt so the sweatshirt can be worn again.

photo 4

and one last idea….if you are not into the whole ugly sweater thing or can’t find/make one. Go for an over the top- if the hunger games celebrated christmas at capital-headdress that will also be a huge hit. Also found at Michael’s for about $2.00

photo-1

Glitter Deer Head

Something Splendid is now over at http://somethingsplendidblog.com. Come check us out over there for even more great ideas.

Deer heads are all the rage this season, and I am right there with everyone else. Growing up in Wyoming meant mounted deer heads everywhere. I never thought I would love those cute little animals. I am sure many of you have seen this gorgeous deer head silhouette on pinterest, and as soon as I saw it, I knew I had to make one too. It was one of the easiest projects ever and it only cost me $3.00 because I had most the supplies on hand.

photo 2

All I did was take a painter’s canvas (mine was about 18″x24″, somewhere around those measurements) and trace a deer head silhouette. I found mine just through a Google search. After that, I painted a thin layer of Elmer’s glue with a foam brush to the silhouette in small sections. Then I dumped a ton of silver glitter to the sections. When it was done I sprayed it with a clear coat of spray paint and let it dry. The whole project took maybe 20 minutes start to finish, and I couldn’t be happier with the results.

Christmas Wreath

Something Splendid is now over at http://somethingsplendidblog.com. Come check us out over there for even more great ideas.
photo

How is it already December 9th? Time passes by so quickly. By now most everyone has their Christmas tree trimmed, their mantles decorated, and their baking list started, but what about your front door? I have seen some of the cutest porches decorated for the holidays. I have also seen some doors empty, but I can help you fix that!

This wreath was super simple, took less than an hour, and costs less than $6.00. Wreaths just add so much to a place. Our little apartment is so welcoming with this simple little thing and makes me smile every time I see it.

Supplies:
-Wreath Form (I used a wreath form that I had lying around, so any size will work)
-Red Yarn
-White Yarn
-Embellishment Picks (I got mine from Michaels for .50 cents each)
-Fun Ribbon (also purchased form Michaels f0r 70% off)

All I did was wrap yarn around the wreath alternating colors and glue the embellishments on. Thats it! So easy. Plus you can customize this to your holiday decor colors.

Felt Nativity

Something Splendid is now over at http://somethingsplendidblog.com. Come check us out over there for even more great ideas.

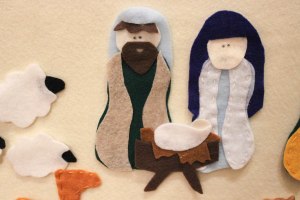
I have a little bit of an obsession with felt. I find so many cute projects to make out of the inexpensive fabric. As soon as I saw this nativity, I knew I had to make one for my nephews. She also includes a stencil that I roughly followed for mine. I used just plain squares of felt and for the background I covered a foam core board with a piece of felt I had cut specifically cut. This project totaled less than $6.00 and took only a couple of hours. My nephews already love it!

IMG_6071

IMG_60753 wise men and cattle

IMG_6076
Mary and Joseph
IMG_6077
shepherds and animals

Felt Christmas Tree

Something Splendid is now over at http://somethingsplendidblog.com. Come check us out over there for even more great ideas.

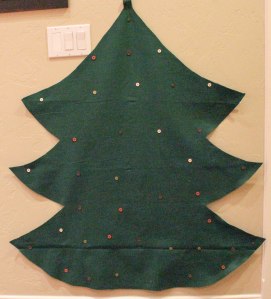
Are you tired of felt yet? I do not think I will ever be. I am sure many of you have seen felt Christmas trees for kids pop up all over the place on pinterest. I pinned one last year about a week before Christmas and decided it was too late to make, but it was in the back of my mind all year. Finally, November rolled around and I could not wait any longer to make it.

IMG_6049

All I did for this project was get a yard and a half of green felt and cut out a tree shape. I then sewed/glued buttons on to hang the ornaments. To stabilize the tree I put three wooden dowels through the back so they can slide in and out for easy storage.

IMG_6042

The ornaments I hand sewed and decorated. I wanted them to be unique and fun and cute. They took the longest but it was so worth it.

IMG_6048IMG_6078

This project totaled less than $10.00 and I can foresee it getting many hours of play throughout the years.